 We're back! To kick things off right, how about a way to celebrate Fall on its very first official day?! I was over visiting Imparting Grace and found this extremely simple way to fill the house with the Aroma of Autumn. [Sidebar: I didn't know how to spell 'aroma' and my 8 year old helped me! Yay for him!] You will need one apple, some cinnamon sticks, some cloves, vanilla extract and a small pot filled with water. That's it! So grab those things and cut your apple into quarters, drop it in a pot with some water and the spices, finishing it off with 1 tsp of vanilla and let it simmer on the stove. Just keep adding water throughout the day so it doesn't boil away. Mm-hmm... I can smell pumpkin pie and apple cider right now.........
Showing posts with label She Renews. Show all posts
Showing posts with label She Renews. Show all posts
Saturday, September 22, 2012
First Day of Fall...First Day Back to Blogging!
We're back! To kick things off right, how about a way to celebrate Fall on its very first official day?! I was over visiting Imparting Grace and found this extremely simple way to fill the house with the Aroma of Autumn. [Sidebar: I didn't know how to spell 'aroma' and my 8 year old helped me! Yay for him!] You will need one apple, some cinnamon sticks, some cloves, vanilla extract and a small pot filled with water. That's it! So grab those things and cut your apple into quarters, drop it in a pot with some water and the spices, finishing it off with 1 tsp of vanilla and let it simmer on the stove. Just keep adding water throughout the day so it doesn't boil away. Mm-hmm... I can smell pumpkin pie and apple cider right now.........
Saturday, June 2, 2012
Our new Shelf!
Here is how the Ugly Green Bookshelf turned out in the end. What do you think?

So far it seems to be working very well for holding the boys' clothes. Definitely easier to get them to put their clothes on the shelf then to try and open and close the drawers.
Now just to keep them from climbing on it...
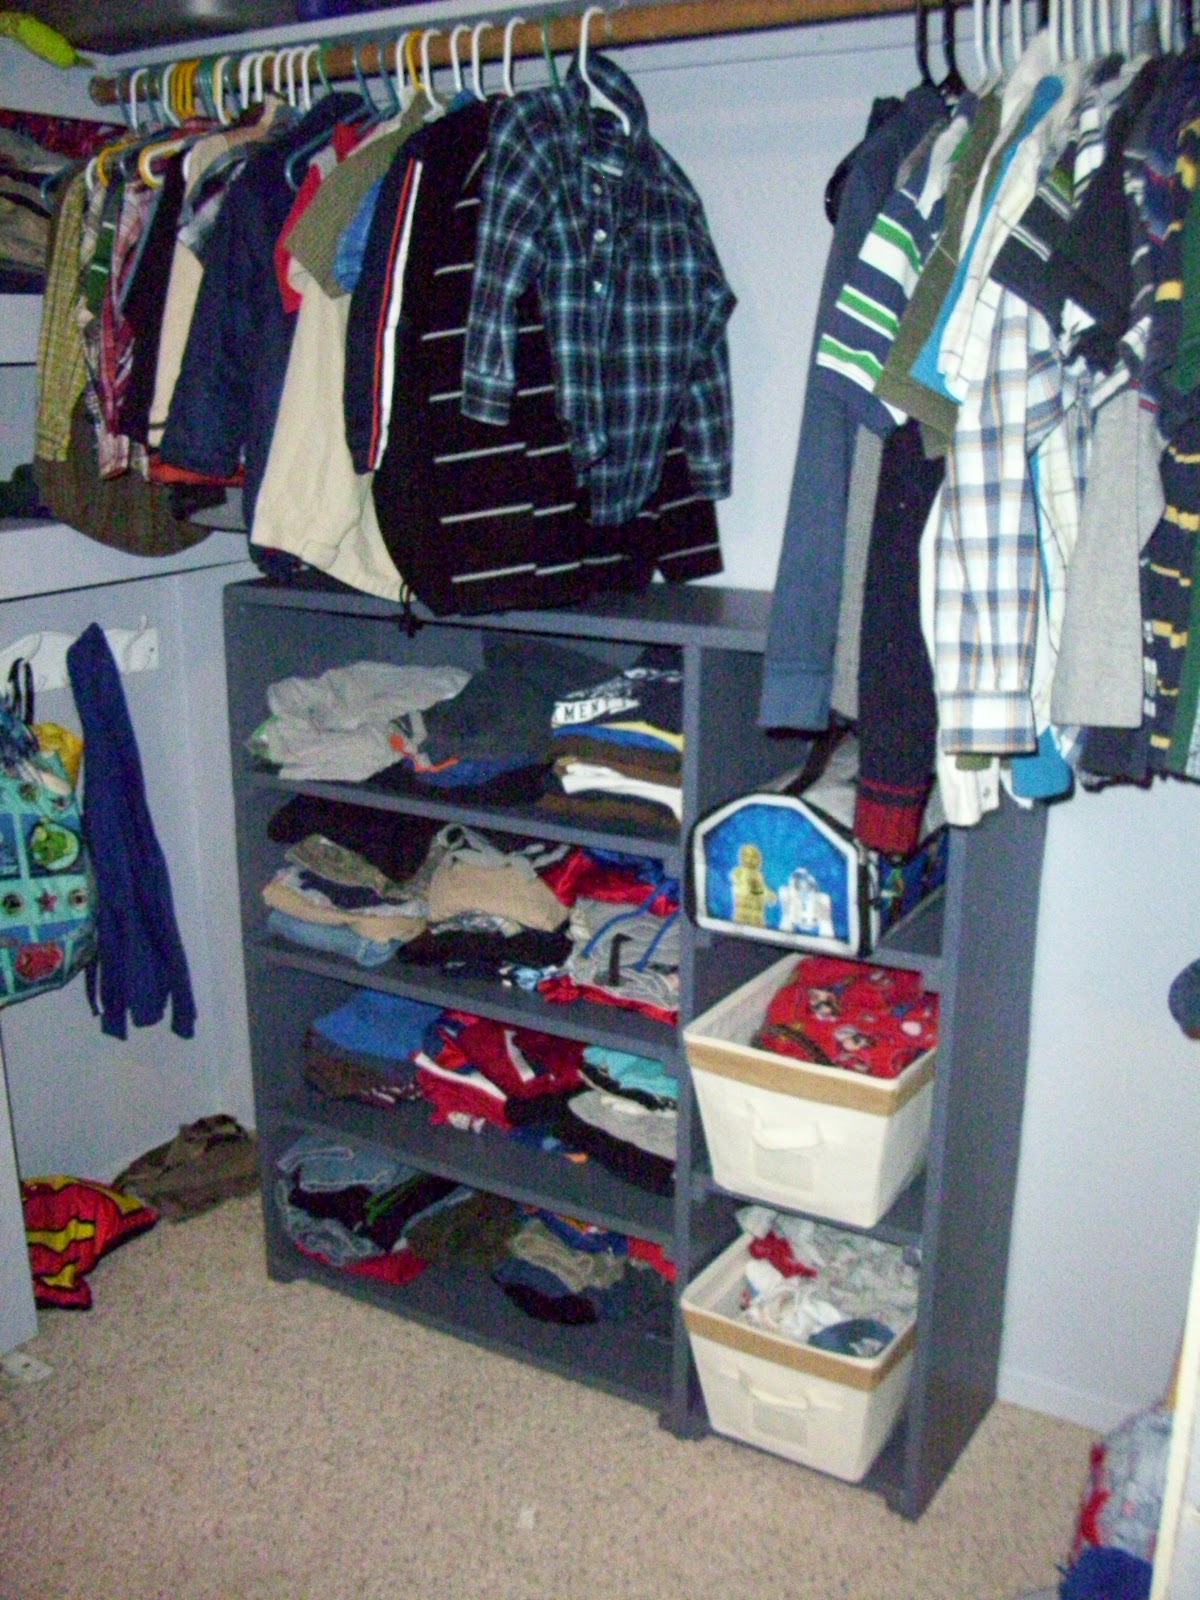
So far it seems to be working very well for holding the boys' clothes. Definitely easier to get them to put their clothes on the shelf then to try and open and close the drawers.
Now just to keep them from climbing on it...
Wednesday, May 23, 2012
The Ugly Green Bookshelf
So, my middle child likes to break things. He averages one item (usually it belongs to me) per day. Recently he broke an entire dresser. He apparently thought that pulling out the drawers like steps and then climbing up to reach the clothes on the hangers would be a good idea. Of course in the middle of doing that he also broke the hangers...
He's okay. No blood.
But the dresser is not.
Instead of purchasing another one and spending like $100, I decided to buy this from a thrift store for $12.

Stay tuned for what I do with it....
He's okay. No blood.
But the dresser is not.
Instead of purchasing another one and spending like $100, I decided to buy this from a thrift store for $12.

Stay tuned for what I do with it....
Monday, April 23, 2012
For Mommies.
 Lord, Help me remember, when I feel it's a chore
the time will come when I'll hold her no more
asleep on my chest, the crib refused
the blanket, the pacifier, gone unused.
What better place is there to lay her head
than against my heart, my arms her bed?
For infants grow up and leave us behind
with only memories left to remind
us of midnight walking and predawn rocking,
of soft, helpless babies unable to sleep.
So, Lord, make me patient and keep me awake
while I cradle this child, and don't let me take
for granted the moments I spend in the night
with this ~ Your gift, my joy, my delight.
~Jan Dunlap
A friend shared this with me recently and it was very encouraging to me.
I hope it also helps you!!!
Thursday, March 22, 2012
Sleep Training Your Baby
For any of you out there that may be thinking about sleep training your baby, I found the videos on this website to be extremely helpful!
Based on the recommendations from this coach, I created my own Baby's Daily Log for keeping track of my daughter's sleeping and eating patterns. I did this for 5 days and then averaged what she did into a schedule that was going to work for her.
Her schedule looks like this: (she is 10 1/2 months old)
Wake/Nurse (whenever she wants--still working on this)
Breakfast at 9:00am
Nurse at 10:30am -- Nap
Wake/Lunch around 12:00pm
Nurse at 1:30pm -- Nap
Wake/Snack around 4:00pm
Dinner/Nurse 7:00pm
Bedtime/Nurse at 8:30pm
Please view my Baby's Daily Log by clicking on this link. You can choose to download and print it if it would be helpful for your experience sleep training as well!
Based on the recommendations from this coach, I created my own Baby's Daily Log for keeping track of my daughter's sleeping and eating patterns. I did this for 5 days and then averaged what she did into a schedule that was going to work for her.
Her schedule looks like this: (she is 10 1/2 months old)
Wake/Nurse (whenever she wants--still working on this)
Breakfast at 9:00am
Nurse at 10:30am -- Nap
Wake/Lunch around 12:00pm
Nurse at 1:30pm -- Nap
Wake/Snack around 4:00pm
Dinner/Nurse 7:00pm
Bedtime/Nurse at 8:30pm
Please view my Baby's Daily Log by clicking on this link. You can choose to download and print it if it would be helpful for your experience sleep training as well!
Thursday, March 1, 2012
Lenten Challenge: Junk Drawer
 So last week began my Lenten Challenge. I started with the junk drawer in my kitchen because I felt that it would be the most rewarding and motivating in my efforts! Here is the before.
  The during. -- Notice my bag next to the empty drawer; this is the trash that I threw out. I also had a pile of stuff to add to my ever-growing "yard sale" boxes. I sorted everything out and then put things away where they were supposed to be!
 Bag #1 is ready to go out for the trash. It's interesting.... as I was going through the stuff in the drawer, I found myself thinking about my kids and their chore of setting the table. There was no good spot to keep the placemats and emptying out the drawer made just the right place! Ultimately the "junk" drawer was supposed to be a place to keep pens/pencils and other items that you need in a pinch.... so hopefully it will return to its original purpose, plus a placemat holder! ;-)
As I emptied my drawer, I prayed for:
- my children as they obey their parents in doing their chores
- my oldest son, as he does his homework (he's always asking for a pencil!)
- myself as I prepare meals with a cheerful heart
- safety for my baby girl -- I thought of this because whenever I find something too small on the floor (LEGOs!) I stick them in the drawer so she won't choke!
 |
| The after. |
Tuesday, February 7, 2012
He's My Brother

 This mama L-O-V-E, LOVES, having boys. They laugh together. They wrestle. They chase the dog. They ride bikes. They help each other clean up the toys. They read in bed together. They build with LEGOS. They help each other memorize their catechism questions. They cuddle their Mom. They love their baby sister. They are awesome.
 Good to remember sometimes.
Tell your son THREE THINGS you like about him at the dinner table tonight. Ask him to tell you things he likes about the other people in your family.
Laugh and Treasure.
The road is long
With many a winding turn
 |
| I'm gonna be just like my big brother some day! |
Who knows where
But I'm strong
Strong enough to carry him
He ain't heavy, he's my brother
So on we go
His welfare is of my concern
No burden is he to bear
We'll get there
For I know
He would not encumber me
He ain't heavy, he's my brother
If I'm laden at all
Then I'm laden with sadness
That everyone's heart
Isn't filled with the gladness
Of love for one another
It's a long, long road
From which there is no return
While we're on the way to there
Why not share
And the load
Doesn't weigh me down at all
He ain't heavy, he's my brother
He's my brother
He Ain't Heavy, He's My Brother
Linking Up:
Join us for Gratituesday at Heavenly Homemakers!
Friday, February 3, 2012
"Simple Solutions for Everyday Organic" (#3)
"7 Ways to 'GREEN' Your Spring Cleaning"
Tips from an article in Mary Janes Farm magazine...
1. Love Your Laundry -- Use half of a dryer sheet each time you run your dryer. It will still help your clothes smell nice and prevent static cling and you'll have less garbage!
 2. Seek Out Simple Tools -- Use traditional cleaning tools like lamb's wool dusters, metal dustpans, straw brooms and don't use the more modern cleaning products that require throw away pads and dusters. [I personally still use some of these because it is easier--but there are a few kinds out there that you can wash and reuse.]
3. Clean without Chemicals -- This is also safer for children! A lot of the cleaning products out there "have been linked to allergies, skin irritations, breathing problems, and even nerve damage."
4. Pass the Vinegar, Please -- Vinegar can kill a lot of the mold, bacteria and viruses that are out there. Use it in a spray bottle. Add 1-cup of vinegar to your load of towels in the washer. Suggested website for vinegar tips: www.vinegartips.com/cleaning
5. Get a Baking Soda Boost -- Pair baking soda with your vinegar and together they will give you a great scrub! Deodorize drains and disposals with 1 cup soda followed by 2 cups boiling vinegar.
6. Put Peroxide to Work -- Removes stains in carpets!!! Pour on some, from the brown bottle under your bathroom sink, and let it dry.
7. Mix Your Own Furniture Polish --
Tips from an article in Mary Janes Farm magazine...
1. Love Your Laundry -- Use half of a dryer sheet each time you run your dryer. It will still help your clothes smell nice and prevent static cling and you'll have less garbage!
 2. Seek Out Simple Tools -- Use traditional cleaning tools like lamb's wool dusters, metal dustpans, straw brooms and don't use the more modern cleaning products that require throw away pads and dusters. [I personally still use some of these because it is easier--but there are a few kinds out there that you can wash and reuse.]
3. Clean without Chemicals -- This is also safer for children! A lot of the cleaning products out there "have been linked to allergies, skin irritations, breathing problems, and even nerve damage."
4. Pass the Vinegar, Please -- Vinegar can kill a lot of the mold, bacteria and viruses that are out there. Use it in a spray bottle. Add 1-cup of vinegar to your load of towels in the washer. Suggested website for vinegar tips: www.vinegartips.com/cleaning
5. Get a Baking Soda Boost -- Pair baking soda with your vinegar and together they will give you a great scrub! Deodorize drains and disposals with 1 cup soda followed by 2 cups boiling vinegar.
6. Put Peroxide to Work -- Removes stains in carpets!!! Pour on some, from the brown bottle under your bathroom sink, and let it dry.
7. Mix Your Own Furniture Polish --
- 1/4 cup white vinegar
- 1 tsp jojoba oil
Thursday, February 2, 2012
To Give a Band-Aid is NOT a Boo-Boo!
 Sometimes you just need a Band-Aid...
 even if there's nothing really there to cover. I see a little one on the verge of a smile instead of tears. You may argue with me, but to me it's worth it to give my kids a Band-Aid when they have a boo-boo even if they don't really need one--just because it makes them feel better!

Sometimes it's even-more-better to have two! (Especially when they make your feet look really cool.) Come to think of it... there's got to be a really good reason that Band-Aids make you feel better, other than the fact that they come with all kinds of fun characters and colors on them.... in fact, check out this website out for proof that it's not a mistake to be generous with the Band-Aids!!!
Let's take this one step further and involve our kids in making a First-Aid Kit for the home so that they know just where to go when they need a Band-Aid. I found a recommended list of items to be kept in a First-Aid Kit:
- Box of assorted sizes of adhesive bandages
- 1" bandage
- 2" bandage
- Package of sterile gauze
- Sterile non-stick bandages
- Ipecac syrup
- Anti-biotic ointment
- Ace wrap (elastic bandage)
- Small sharp scissors
- Tweezers
- Adhesive tape
- Needles
- Matches
- Hydrocortisone cream
- Benadryl cream or antibiotic ointment
- Disposable instant cold pack
- Alcohol swabs
- Plastic gloves
- Emergency phone numbers (doctor, hospital, and poison control)
Tip: Our kids get Band-Aids in their Christmas stockings with their favorite characters on them to use when and however they please. It's great fun and it's great for them!
Let's face it... Boo-Boos happen. But please go and be SAFE! ;-)
Wednesday, February 1, 2012
Encouragement for Mothers

Please head over to this website and read about the author's recent challenge to mothers out there. This topic has been in the forefront of my mind for quite awhile now. I feel like sometimes the ONLY WAY TO GET my kids to listen to me is to YELL. It seems like they just [literally] don't hear me otherwise.
I encourage you to meditate on this as well and see where God is guiding you in how you talk to your children.
Proverbs 15:1 “A gentle answer turns away wrath but a harsh word stirs up anger.”
Friday, January 27, 2012
"Simple Solutions for Everyday Organic" (#2)
These seven ideas for ways to lower your grocery bill were taken from an article I read in Mary Janes Farm magazine...
1. Buy outside the box. Shop the outer rim of the grocery store. All those center aisles are filled with boxed items that are expensive and processed and not good for you!
 2. Think big. Buy items in bulk and divide them up into your own smaller containers to be reused. Check the store tags for price per unit and buy the cheapest packaging size. [We reuse many containers--for example my homemade laundry soap is currently in an old yogurt tub!]
3. Freeze it. Once you've bought those bigger items and divided them up, freeze them! It will be so fun to go grab that meat or cheese from the garage instead of the store!
4. Heads up. Don't buy those pre-packaged salads. Buy the items fresh and make it yourself. The cut ends of the produce spoil quicker since more of the leaf is exposed to oxygen.
5. Weighty issues. Weigh bags of potatoes, onions and fruit before you choose which one to get. Since they are packaged as 3, 5 or more lbs, you can possibly find up to 3/4 lb. larger bag and get that for the same price as a lighter one!
6. Herbal magic. Like to buy fresh herbs but can't use them up before they spoil? Take some away and hang it upside down to dry for later!
7. Tote it with you. Use a reusable shopping tote (some shops will give you a refund for using them!)
1. Buy outside the box. Shop the outer rim of the grocery store. All those center aisles are filled with boxed items that are expensive and processed and not good for you!
 2. Think big. Buy items in bulk and divide them up into your own smaller containers to be reused. Check the store tags for price per unit and buy the cheapest packaging size. [We reuse many containers--for example my homemade laundry soap is currently in an old yogurt tub!]
3. Freeze it. Once you've bought those bigger items and divided them up, freeze them! It will be so fun to go grab that meat or cheese from the garage instead of the store!
4. Heads up. Don't buy those pre-packaged salads. Buy the items fresh and make it yourself. The cut ends of the produce spoil quicker since more of the leaf is exposed to oxygen.
5. Weighty issues. Weigh bags of potatoes, onions and fruit before you choose which one to get. Since they are packaged as 3, 5 or more lbs, you can possibly find up to 3/4 lb. larger bag and get that for the same price as a lighter one!
6. Herbal magic. Like to buy fresh herbs but can't use them up before they spoil? Take some away and hang it upside down to dry for later!
7. Tote it with you. Use a reusable shopping tote (some shops will give you a refund for using them!)
Wednesday, January 25, 2012
Telling the Truth
At the core of all the pressures to abandon the self is the temptation to lie about what we really think, feel, and believe.
Martha Beck, Breaking Point
Who do you consider your truest friend? Your most authentic relationship? Do you have more than one? Who in your life do you feel that you are the "most real" with? Do you have fake relationships? Do you say one thing while you mean another?
These are questions that I have been asking myself lately. Even the people that I feel the closest to, I am sometimes not honest with. Of course I am not consciously doing this. I don't walk around LYING whenever possible... but if I sit down and really think about it... I am not always speaking the truth. I am afraid. Even of the people I love the most. In my efforts to be a kind person who never has conflict or makes anyone else uncomfortable, I find that often times I ignore what my gut is telling me and say what I think they want to hear!
"Telling the truth means we need to take responsibility for our feelings, thoughts, beliefs, and desires. When we cannot face the truth--or fear others will reject us because of it--we tell little lies. We lie to ourselves. We lie to those we love. We lie to strangers. We get so used to lying that we no longer know the truth from falsehood. Our lies do not have to be big to get in the way of having an authentic relationship." Taken from A Generous Presence by Rochelle Melander
Can you think of ways that you "tell little lies" each day when you should be speaking the truth? Not just because it's the right thing to do, but because if you really think about it--don't you think that the people who love you also want to know you? Know the real you?
Rochelle Melander says that there are two steps to learning how to tell the truth:
1. Recognize it. Ask yourself: "what do I know?"
2. Actually tell it. "The truth can be hard to hear. When we begin to tell the truth in a relationship or institution committed to a culture of posturing, we may be rejected. Of course, without this truth telling, we risk not knowing the richness of having an authentic relationship--with ourselves and one another."
Can you think of a time where you told the truth and it created a foundation for an authentic relationship?
Remember it. Try it again!
Join us for Gratituesday at Heavenly Homemakers!
Friday, January 20, 2012
"Simple Solutions for Everyday Organic" (#1)
These seven ideas for ways to improve your own life were taken from an article I read in Mary Janes Farm magazine...
1. Take a walk outdoors. Sometimes even just walking down the street and back can pick up your spirits and give you energy to finish out your day.
2. Create a collage. Find a picture that speaks to you in some way? Start collecting them and turn them into an art project that displays what you love in life.
 3. Find a few minutes for free writing. Find a beautiful journal just for you and write your thoughts in it. Track the path of your life by reading former entries.
4. Dance. Just do it. It's fun. Who cares whether you can or not.
5. Meditate. Even just five minutes of stillness can make all the difference in a busy day.
6. Create a meal, slowly. Make something just for you. Enjoy the cooking process as much as the eating of it.
7. Practice praise. Admire others and tell them.
1. Take a walk outdoors. Sometimes even just walking down the street and back can pick up your spirits and give you energy to finish out your day.
2. Create a collage. Find a picture that speaks to you in some way? Start collecting them and turn them into an art project that displays what you love in life.
 3. Find a few minutes for free writing. Find a beautiful journal just for you and write your thoughts in it. Track the path of your life by reading former entries.
 4. Dance. Just do it. It's fun. Who cares whether you can or not.
5. Meditate. Even just five minutes of stillness can make all the difference in a busy day.
6. Create a meal, slowly. Make something just for you. Enjoy the cooking process as much as the eating of it.
7. Practice praise. Admire others and tell them.
Doesn't that make you feel better?
Thursday, January 5, 2012
She Considers... A Garden of the Heart
Shared by our Mom... found in a cookbook of hers that was compiled by members of a former church.
Author Unknown.
Plant your own garden beginning today.
Author Unknown.
Plant your own garden beginning today.
First plant five rows of peas:
Preparedness
Promptness
Perseverance
Politeness
Prayer
Next to them plant three rows of squash:
Squash gossip
Squash criticism
Squash indifference
Then five rows of lettuce:
Let us be faithful
Let us be unselfish
Let us be loyal
Let us be truthful
Let us love one another
And no garden is complete without turnips:
Turn up for Church
Turn up for Sunday School
Turn up with a smile
Turn up with determination
Friday, December 9, 2011
Update on House Painting
 |
| BEFORE |
 |
| BEFORE |
Originally I had more complicated plans for color -- trim on this, body color on that, a bit of foundation color over here... but I heeded wise counsel to keep it simple, sweetie and not draw attraction to less-than-beautiful architectural "features" with lots of color changes.
We also debated the color of the exterior window shutters a good bit but ended up using the foundation color (we bought paintable shutters) as a way to tie in the color on the bricks. I think it looks nice and is a great improvement!
 | ||||||
| We have a bit of snow today which makes everything look even prettier. |
 |
| AFTER |
Color key:
Sherwin Williams Duration exterior paint
Body: SW 6159 High Tea
Trim & porch ceiling: SW 6155 Rice Grain
Foundation, porch floor/concrete trim, shutters: SW 2838 Polished Mahogany
Thursday, December 8, 2011
Celebrating Jesus' Birth with Our Kids
 A friend recently shared an idea on Facebook of Family Devotions for Advent. I really like it! So we talked about it and decided to do these activities with our children this month. Unfortunately we are a little behind, but it's okay... we can catch up! :-) My husband picked up these candles today at the store and we hope to start tonight.
Here are the first two activities we are going to try, thanks to Toddler Bites!
Devotion #1
Theme: Jesus had a family…we do too
Scripture: Read Luke 1:26-38.
Family Memory
Verse: For nothing
is impossible with God. Luke 1:37
Discussion
Starter: Place a bowl
filled with Hershey’s Kisses in front of your children.
Tell them that
they may eat as many and they want as long as they don’t use their hands to
unwrap them. Allow time to try.
Discussion:
It was nearly
impossible to get the paper off of the Hershey’s Kisses without using your
hands.
Ask: what are
things that are impossible for us to do that God can do? Is there anything that
is impossible for God to do? Why or Why not?
In our
scripture reading, we learned that an angel told Mary she would have a
baby-God’s son. She thought this was impossible because she wasn’t married. But
with God, nothing is impossible.
Mary’s cousin
Elizabeth, who was a much older woman – maybe the age of your grandmother – was
also going to have a baby. This seemed impossible, but not for God.
Read Luke
1:13-19.
Ask: what is
something that you are facing that seems impossible? What do you think Jesus
would have you do about that “impossible” thing?
Prayer: Ask God to help you remember that nothing
is impossible for Him.
Devotion #2
Theme: Angels and Shepherds
Scripture: Read Luke 2:8-20.
Family Memory
Verse: Luke 2:13-14 And
suddenly there was with the angel a multitude of the heavenly host praising
God, and saying, Glory to God in the highest, and on earth peace, good will
toward men.
Discussion Starter: Provide a
flashlight for everyone in the family. Cut out the shape of an angel (5 inches
high) from dark construction paper. Cut one for each family member. Turn off
the lights and explain that the story we will hear happened at night.
Discussion: Read Luke
2:8-14, by flashlight. When you get to verse 9, shine the flashlight beam
across your angel to create a large shadow on the wall. When you read verse 13,
have everyone project their angels on the wall. Read Luke 2:15-20. Why do you
think the shepherds “came with haste?” (vs. 16)
What did the
shepherds do after they had visited with baby Jesus? (Re-read vs. 17, 18, &
20…they told everyone about what they had seen and heard; they praised
glorified and praised God)
Ask: are we
excited to share the news about Jesus birth with others? Have we stopped to
praise and glorify Him this season?
Prayer: Pray a prayer of praise to God. Ask Him to
help you share the news of Jesus’ birth and the reason for His coming with
others.
Advent Activity: Light the Candles during dinner each day this week according to what week of advent we are in. This week we will be lighting the two outer Purple candles until Sunday, then we will also light the Pink.
Week 1 (Nov. 27) -- Purple (Hope)
Week 2 (Dec. 4) -- Purple (Preparation)
Week 3 (Dec. 11) -- Rose (Joy)
Week 4 (Dec. 18) -- Purple (Love)
Week 5 (Christmas Day!!!) -- White (Christ)
Thursday, October 27, 2011
House Projects Update 1.0: Choosing Exterior House Colors
 Our little house in northern
The five of us lived in this house for the freezing-cold-snowy-winter spring semester of 2008, the three bedrooms occupied by my husband and me, the two girls sharing, and my son. The fall of 2009 our son began his freshman year at the university in town and the remaining four of us spent that semester here. This fall it is just the three of us since my older daughter has also begun college a few hours away in central Michigan.
At first, we bought just a few new things for the house, furnishing it mainly with duplicates or cast-offs from our home in North Carolina
So to this end, there have been lots and lots of projects – small, medium, large, and a few extra large.
I am sharing a few of them here with you in the hope that you may be entertained (I always like reading about other people’s home improvement projects and I thought maybe you do too?), perhaps informed, possibly inspired.

First, the Big One – getting the exterior painted! Wow.
In my 28+ years of home ownership I have never actually had the privilege of having to make decisions about house painting. Either we’ve just put the same color on whatever house we were living in, or we lived in a brick home where painting was just not an issue. Now I had to decide how to take my little white house with battleship gray trim from Drab and Boring to Exciting and Warm. (My husband particularly dislikes white-painted homes and repeatedly complains that “there are too many white houses in this neighborhood”.)
The other challenges posed by the exterior of the house (besides its lack of architectural significance) are the screen porch, ugly metal storm door and the falling-apart-in-places painted brick foundation. Yeah. [These will all be addressed in future posts.]
Here are a few tips on choosing exterior house paint colors:
- Drive around your neighborhood and take note of houses that appeal to you -- that just make you happy -- and note specifically what it is that you like -- is it one specific color they used or a combination of colors? [If you can't find anything that appeals to you in your neighborhood look around in a neighborhood with houses that you do like!]
- Do this several times and try to note what consistently draws your eye. Choose a general color direction (like taupe or green or blue) and pick up some paint chips from your local paint or home improvement store. Often you can get brochures which will suggest color combinations. These can be helpful in getting you focused. Hold the chips up outside during different times of day and see what continues to appeal. [You can get large paint chips from paint stores if you ask--do this when you've narrowed your choices down to just a few.]
- Once you've started to focus on certain colors drive around again and take photos of houses that are similar to yours and/or use similar color combinations to what you are considering. Load the pics on your computer and study them, noting what you like and don't like.
- Take advantage of online color choosing helps. I found this one really useful: Sherwin-Williams Color Visualizer. You can load up a drawing of a house that is kind of like yours and plug in your color choices -- they won't be the same as in real life (as your screen will alter the colors a bit) but it will help you get an idea of what works together and what might not).
- It's usually a good idea to pick colors that are on the same strip or in the same general color family. For example, my body color and trim color are found on the same color strip and are both in the color family of "Warm Neutral".
- Ask friends and relatives for their opinions and ideas! People love to weigh in on this kind of stuff and you will get helpful input. [Whatever isn't helpful you can just ignore.]
 |
| Here is the back of the original house after it has been scraped. The sunroom addition did not need to be scraped because it has vinyl siding on it (which can be painted!) |
 |
| After one coat of body color and some of the trim color has been applied. The decks were power washed and will also be stained, but I haven't chosen that color yet -- this part of the project might have to wait until spring anyway as the weather is getting colder and wetter. Come back for more House Projects Updates and helpful home improvement tips! |
Friday, October 21, 2011
Making Your Home a Haven (Week 3) UPDATED!

Here’s week #3′s Challenge: List a few of the spots in your home that make you visually stressed. Now go buy something for that spot – like a basket to put it all in!
Work on cleaning up clutter. Throw things away.
While you’re at it – clean up some clutter in your spiritual life. What gets in the way of your peace spiritually? (Courtney @ womenlivingwell.org)
I LOVE this week's challenge. Clutter is a major problem for us. Courtney posted a video of her home and her clutter to show that just because she posts great ideas and appears to have it all together, she is REAL and she's NOT PERFECT. Definitely true for me... for example...
 |
| These are the three areas in our home that are constantly covered with clutter. |
So what am I going to do about it? [Here are the suggestions from the challenge.]
My tasks are:
1. Use a basket/bucket/bin to collect items that would normally spread around my house and clutter up my workspace(s). We don't have two stories in our home, but a great place would also be to put one near the bottom of a staircase so that if there are items downstairs that BELONG upstairs, they can be carried up periodically in one trip using a basket!
2. Set a timer and go quickly through the house grabbing trash and clutter that can be thrown away!
 |
| This is my basket that I purchased for this challenge. |
Are you still lighting your candle and listening to your music and praying for a peaceful home? Thinking about a clutter-free home makes think about my own life and my own heart. I think I just might add praying for a "clutter-free heart" to my list as well!
Okay... I did some cleaning up and boy does it look better!
Just don't get out your white glove....


Wednesday, September 21, 2011
Cleaning up Copper
Our little house here in northern Indiana was built in the 1920s. This is both a good thing and a not so good thing, as those of you who live in older homes will know! One good thing is that some of the trim and fittings and fixtures, though old now and showing their age, were quite nice when originally installed and worth fixing rather than replacing. The three heating and a/c vents in the living room and dining room are a case in point.
Here's what they have been looking like since we bought the home a few years ago:
My husband and I have been trying to figure out what to do since they looked so bad and can't just be ignored -- they are very visible in the rooms and about 14 inches square. I did some online research to see if we could replace them, but couldn't find anything in this size and shape. So we decided to see what we could do to remove the peeling paint and clean up the copper ourselves.
First I used a paint scraper and gently removed all the peeling and loose paint pieces. Then my husband finished that part of the project, boldly removing all the rest of the paint with a scraper. He wasvery somewhat careful to keep scratches to a minimum, but we weren't too worried about it because we knew there'd be several steps after the old-paint-removal step.
Second, we mixed up a solution of equal parts plain table salt and distilled white vinegar (2 tblsps. of each was enough for this project). We applied the somewhat runny paste with an old toothbrush, gently scrubbing most of the tarnish and stains off, finishing by wiping the copper clean with a rag.
The third and final step was to apply copper polish we bought at the grocery store, to remove the last bits of tarnish and shine up the metal!
Here's what they have been looking like since we bought the home a few years ago:
 |
| Actually this is better than what it looked like since this photo was taken after I scraped off most of the loose paint! |
First I used a paint scraper and gently removed all the peeling and loose paint pieces. Then my husband finished that part of the project, boldly removing all the rest of the paint with a scraper. He was
 |
| This is after scraping off the paint and before the cleaning step. |
The third and final step was to apply copper polish we bought at the grocery store, to remove the last bits of tarnish and shine up the metal!
 |
| Here's what it looks like now after the final step of applying copper polish. The white metal flap will be painted glossy black. |
I think it looks amazing and am excited to repeat the process with the two remaining registers. My husband will complete the renovation by repairing the louver behind the register and painting the metal flap with black enamel. I am so happy we found a way to re-use this small part of this old house!

[Post updated with photo above -- after the flap was painted and the whole thing was attached back into the wall & baseboard.]

[Post updated with photo above -- after the flap was painted and the whole thing was attached back into the wall & baseboard.]
Saturday, September 17, 2011
Another Cleaning Mystery Solved!
No matter how many times I run my oven through its self-cleaning cycle... I cannot get the oven door glass to be clean and see-through again... that is until now!
Just mix up 1/2 cup baking soda with enough water to make a paste, spread it on the glass, set the timer for 15 minutes and wipe it away!!! I ran my self-clean cycle also to remove the grime on the inside of the oven and on the door. Little stinky, but that's what scented candles are for.
Check it out!!! Makes this Mama happy!!!

Thanks Anna!!!
Just mix up 1/2 cup baking soda with enough water to make a paste, spread it on the glass, set the timer for 15 minutes and wipe it away!!! I ran my self-clean cycle also to remove the grime on the inside of the oven and on the door. Little stinky, but that's what scented candles are for.
Check it out!!! Makes this Mama happy!!!

Thanks Anna!!!
Subscribe to:
Posts (Atom)